
Here you can select the audio input that LUCI will stream, and which audio output it uses for the return stream.
 For testing the audio you can route the input directly to the output.
 When you stream in mono and select a stereo audio input you can select the “Input channel for the mono stream” to define which audio input is send.
On Windows you have the ability to use different audio driver standards, WASAPI or ASIO.
ASIO is a proprietary audio interface standard which bypasses the operating system’s mixing kernel, so providing lowest latency direct communication between computer audio software and hardware. Some Hardware manufacturers supply an ASIO driver, or you can use ASIO4ALL.
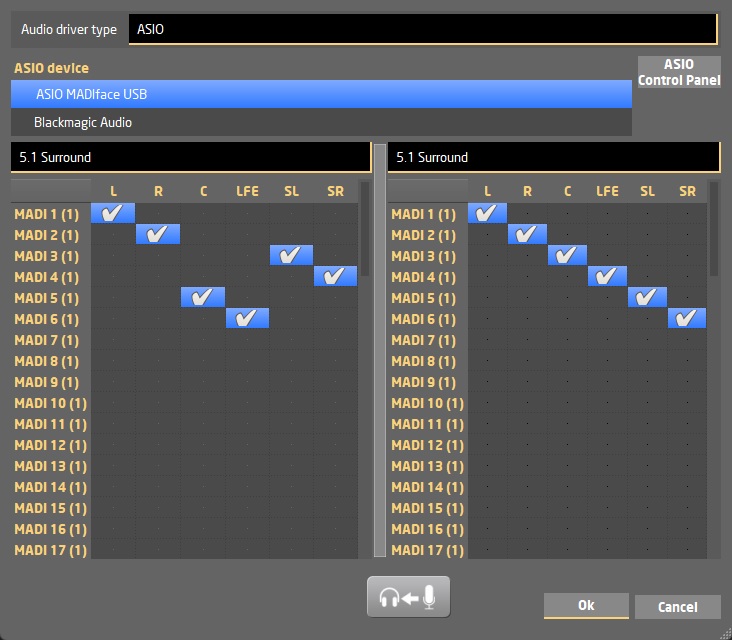
Here’s an example screen when you have purchased the Surround plugin also, you can choose different modes for the input and output independently: Mono, Stereo, 5.1 surround or 7.1 surround. Without surround you only have Mono or Stereo available.
WASAPI is the Microsoft solution to get lower latency. It has 2 modes:
 WASAPI Shared mode, that shares the audio in/output with other applications, restricting the setting of Sample frequency and data bits to be determined by the Systems Sound Playback/Recording Advanced Properties ->
- WASAPI Exclusive mode, that handles an in/output exclusively giving LUCI the ability to determine sample frequency and data bits.
When WASAPI is selected you can set the hardware’s desired latency or leave it to it’s default. At Shared mode you also see the Samples frequency set at the device properties.
![]()
Known problems on Windows 10, and newer MAC os:
If on Mac the audio input is not working or on Windows 10 you get the message:
Can not start audio I/O.
Please check the sample-rate or connections.
and you are sure that the Audio device Input and Output are connected and in working order than chances are that the Systems Microphone privacy settings are not properly set.
On Windows 10: Type “Microphone privacy settings” in the Search bar of your System and set the “Allow Desktop apps to access your microphone” to on.
On MacOs: Navigate to Security and Privacy in the System Preferences drop-down menu. Next, open the Privacy tab, where you will find a list of different features and services that can be accessed by the apps you have installed. Choose the Mic and select LUCI STUDIO to grant access to the Microphone.